With the help of Hyper-V you don’t have rely on third-party hypervisor programs like VMWare Workstation and Virtual machine to create virtual machine on Windows 11 PC. You can make use of Hyper-V feature of Windows 11 to run and test older version of Windows. For example, if you’re running Windows 11, then you can create separate virtual machine for Windows 10 and Windows 7. Hyper V feature is available in particular editions of Windows 11 which includes, Pro, Enterprise, and Education. On the other hand, if you’re using Windows 11 Home edition, then you need to take help of workaround to run it.
Enable or Disable Hyper-V in Windows 11
In case, you want to try Hyper V feature of Windows 11 to create virtual machine, then its disabled out of the box and you need to enable it manually. You can use following two methods:
Via Control Panel Using Windows Terminal (CMD/Powershell)
Before you proceed, we would like to tell you that the steps discussed below are not applicable for Windows 11 Home edition then check out post on How to Enable & Install Hyper-V in Windows 11 Home PC
Enable | Disable Hyper-V using Control Panel in Windows 11
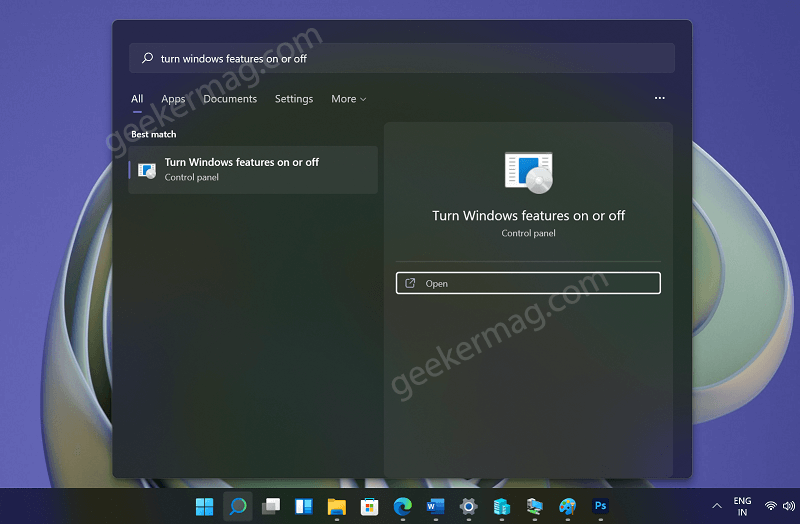
Click on the Search icon and type “Turn Windows feature ON of OFF“, when it appears in search results, click to open it. The window that open, you need to locate and check box for Hyper-V. Also, make sure that all the option listed under it are also checked. After Windows feature prompts, navigate to ‘Hyper V’. Now keep this thing in mind:
Check Hyper-V option to Enable Uncheck Hyper-V option to Disable
Next, click on the Apply button. A new window will open and apply the changes. For that, you need to wait for few seconds. At last, you will be asked to restart your computer to apply the changes. After successful reboot, depending on your choice, Hyper-V feature will be enabled or disabled on your Windows 11 PC. Doing this will add Hyper-V Manager in Windows 11 using which you can run Virtual Machine. This is how the UI of Hyper-V Manager looks like:
Enable | Disable Hyper-V using CMD/Powershell in Windows 11
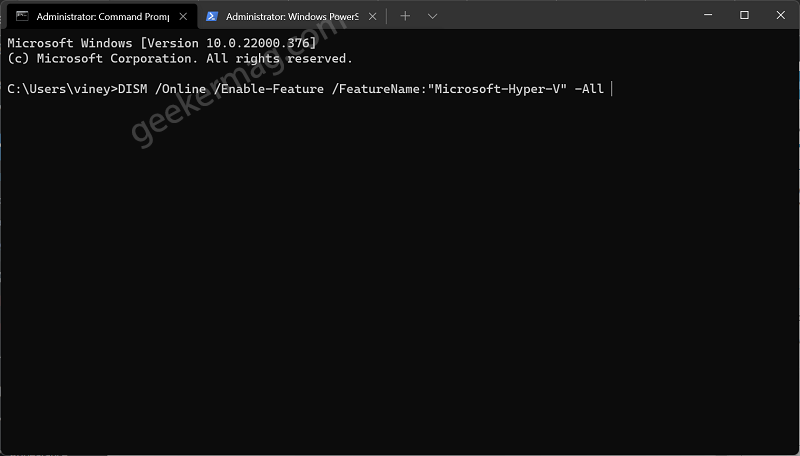
Right-click on the Start button and select ‘Windows Terminal (Admin)‘. Here, select default shell profile, it could be Windows PowerShell (Default) or Command Prompt. To open shell profile of your choice, click on the Down arrow icon and from the menu select PowerShell or Command Prompt Now type or paste the below-mentioned command in the PowerShell or Command Prompt To Enable Hyper-V in Windows 11 using CMD DISM /Online /Enable-Feature /FeatureName:“Microsoft-Hyper-V” -All To Disable Hyper-V in Windows 11 using CMD: DISM /Online /Disable-Feature /FeatureName:“Microsoft-Hyper-V” To Enable Hyper V in Windows 11 using Powershell: Enable-WindowsOptionalFeature -Online -FeatureName Microsoft-Hyper-V -All To Disable Hyper-V in Windows 11 using Powershell: Disable-WindowsOptionalFeature -Online -FeatureName Microsoft-Hyper-V -All If command to enable or disable Hyper-V using CMD and Powershell is executed successfully, you will be asked to reboot your computer, type Y to confirm that action and your computer will reboot automatically.