Windows 10 comes with lots of useful features, but apart from them, there are many issues and errors that users are facing while working on it. One out of them is Explorer.exe class not registered in Windows 10. Most of the time when users try to launch Windows File Explorer or any other program on Windows 10 they receive an error message which reads
Fix: Explorer.exe class not registered in Windows 10
Lots of users don’t even have any idea why they see the Class Not Registered Explorer.exe error message. If you’re one out of them unable to Start Menu, Edge, Internet Explorer, Cortana, and other programs, then try the troubleshooting steps mentioned in upcoming lines to resolve the issue.
1. Quick Reboot
As I shared with you so many times, more than 70% of issues related to Windows operating system can be fixed just by performing a quick reboot. So in this situation, you can also try this step.
2. Disable iCloud
Lots of users reporting on the internet the iCloud installed on the Windows 10 was causing the issue. So to fix the problem simply disable the iCloud Startup service. Here is how you can do that: In the Windows, 10 Taskbar make a right-click, and from the context menu select “Task Manager.” In the Task Manager window switch to Startup and look for iCloud. Now make a right-click and select Disable.
Reboot your system and check if this fixes the issue. If not, then try the next step.
3. Re-register ExplorerFrame.dll file
Some users suggested they fixed the error Explorer.exe Class Not Registered in Windows 10 by Re-register ExplorerFrame.dll file. Here is how you can do that: Launch Elevated Command Prompt window in Windows 10. In the terminal type regsvr32 ExplorerFrame.dll and hit Enter.
Once the process is completed, reboot the system. It will look for and replace the corrupted files of the windows operating system if found any.
4. Run System File Checker
If the above step fails to fix the issue, then chances are ExplorerFrame.dll is corrupted. To fix that try to replace the damaged file with a good one. For that, you can take the help of a run system file checker. Here is what you need to do: Launch Elevated Command Prompt window and type sfc /scannow and hit Enter.
The process may take few minutes. Once it’s completed reboot the system.
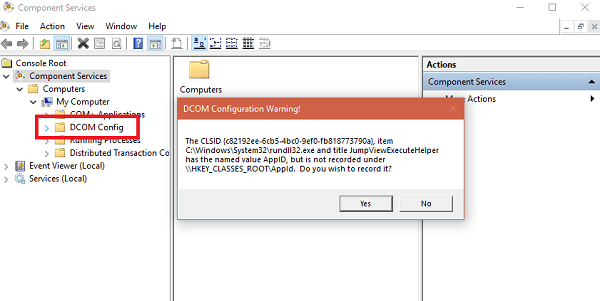
5. Use Component Services – Fix DCOM Errors
In some cases, the Windows 10 users fixed the issue by taking the help of Component Services. Here is what you need to do:
- Type dcomcnfg in the Start menu search bar. When the same command appears in the search result, click to open it. Navigate to the following location: Component Services > Computers > My Computer > DCOM Config. Click on the arrow to expand DCOM Config, and you will see various dialog boxes asking if you desire to register some of the components. Here you need to click on the Yes.
You may experience this once or many times. Once the process is completed, this will fix the DCOM errors, causing Class Not Registered Explorer.exe errors.
6. Restart Explorer.exe
Restarting the Explorer.exe file also worked for some users. Here is how you can do that: Launch the Task Manager by pressing CTRL +SHIFT +ESC keyboard combo. Here scroll down until you find the Explorer.exe process. Once you find it make right-click on it and select End task.
Now Click on the File -> Run new task. In the space provided type Explorer.exe and click OK.
Windows Explorer will start again, and I’m sure this will also fix the issue.
7. Service Manager – Restart Internet Explorer ETW Collector Service
In the Start menu search bar, type services.msc, and when the same result appears in the search result click to open it. This will open the Services Manager. Here scroll down and look for the service which reads “Internet Explorer ETW Collector Service.” Make a right-click on it and select the Start button.
This will help if you’re facing any issues while using Edge and Internet Explorer.
8. Create a New User account
You can also try to create a new user account. After creating a new user account log into your system using that account if this fixes the issue.
9. Re-register Windows Store apps
You can also try to Re-register Windows Store apps in some cases this also helps the user in fixing the problem. For that: In the Start menu search bar type Windows Powershell and when the same application appears in the search result make a right-click on it and Run as administrator.
In the Windows Powershell terminal type or paste the following code and hit enter.
Once the process is completed. Reboot your system and check if this fixes the issue. In case, nothing worked for you; then the last resort is to perform a clean installation of Windows 10. I hope this post on how to fix Explorer.exe Class Not Registered In Windows 10 useful. In case, you need any assistance then drop it in the comment section.